In and amongst school and toy orders I’ve had some time to come up with new packaging and make a few new wooden toys…


Just love packing up a special gift and sending it to its new home!
In and amongst school and toy orders I’ve had some time to come up with new packaging and make a few new wooden toys…
Just love packing up a special gift and sending it to its new home!

At the beginning of our school holiday I was super excited to have some time to search for new wooden toys and resources for our school. Nothing was going to stop me finding the perfect wooden animals, caves and scenes for us to use in play provocations and small worlds this coming term! After spending the first few days searching for local suppliers and following up on all sorts of leads I realised I wasn’t going to find what I was looking for. There are so many beautiful wooden toys out there drooollll but it seems I’d have to import them and this just isn’t a practical solution for me. I am passionate about beautiful wooden toys that are natural and sustainable. The natural wood textures stimulate our littlies senses inviting them to touch, feel and explore. Besides their durability and safety, wooden toys are ideal for encouraging creative and imaginative play. The only solution was to make them myself! I’m incredibly fortunate that my neighbour and his brother own and operate a sawmill that I could source not only local but sustainable wood for my toys. I found a second hand scroll saw online a little workshop corner at home and started playing around!


Ive had so much fun and want to recommend that if I can do this you can do it too!! The end product takes time and muscle to sand and finish properly and safely but totally do able and such fun!


More on these projects to follow!

I consider having plenty of loose parts available at all times for play one of the most important things at school. There are so many different types, sizes, uses – the list is endless! I’m constantly on the look out for new loose parts to add to our collection at school. I love natural loose parts but I definitely feel there is a place for synthetic loose parts as well.


I like to swop in and out with different items so that there is plenty to inspire play, teamwork and interaction. One of my best buys was a set of large pvc covered colourful shapes. These are always outside and available for construction and building – whether the children are building castles, shops, firetrucks, you name it, there is a constant hive of activity as they move, build and climb. They are fantastic for developing body awareness and movement. In the past I have also provided plastic crates for holding bottles (a LOT of them!) – these are fantastic as they clip into each other and the children can actually construct whole play scenes for themselves.


In the summer months the loose parts are stored in large garden pots in a wooden frame (actually an old sandpit frame) that is often turned into some creative vessel or other. Other great items we love are: various ropes of different length and texture; pinecones; curtain rings; pegs; gutter piping and all the varying joining bits; plastic balls; pebbles in the dry creek bed – the list can be endless!


I’ve always seen wonderful wooden fences in gorgeous school blogs and never been able to find them. As a substitute I’ve tried plastic fences – but lets face it they just fall over and cause endless frustration! To have sturdy wooden fences would be awesome right? So after having the wood lying around for days weeks patient husband pandered my whims and made me a whole box of wooden fences – bliss!
Items we used: long squared piece of wood (25mm x 25mm), dowling rod (your pick of thickness – thicker the sturdier), sander, glue gun
Basically just cut the fence ends into equal lengths (mine are just over 10cm) and sand the edges so that they are not sharp. Cut the dowling rod into equal lenths. Measure and and drill holes into wooden sides and attach dowling into holes with extra glue to secure. Your measurements need to be quite acurate to ensure the fences actually stand. We applied a non toxic wood sealant to ours – optional. If you are unable to make your own get in touch with me to buy a batch – smallschoollove@gmail.com…


The great thing about wooden fences is that they can be used for all sorts of smaller loose part play provocations. They also stand on most surfaces (you can see they even stand on our grass carpet). I use them indoors and outdoors and the children spend ages incorporating them into their play.


Every school home with children should have an outdoor mud pie kitchen! Some of my clearest memories growing up are of mixing mud, water, sand and leaves to make “food”, “potions” and “medicine”! As an only child I could spend hours on my own concocting and mixing quite content in the sun or rain…
At school I’ve found our mud pie kitchen to be the hub most outdoor days. It’s a hive of activity as the children chat, share, laugh and invent their own recipes. Situated next to the sandpit and dry creek bed it soon turns into a vibrant chaotic sandy stony mess delightful play space!
Items we used: wood to make box table and shelves; bricks; stainless steel hanging hooks; assorted pots, pans, cups, spoons etc.
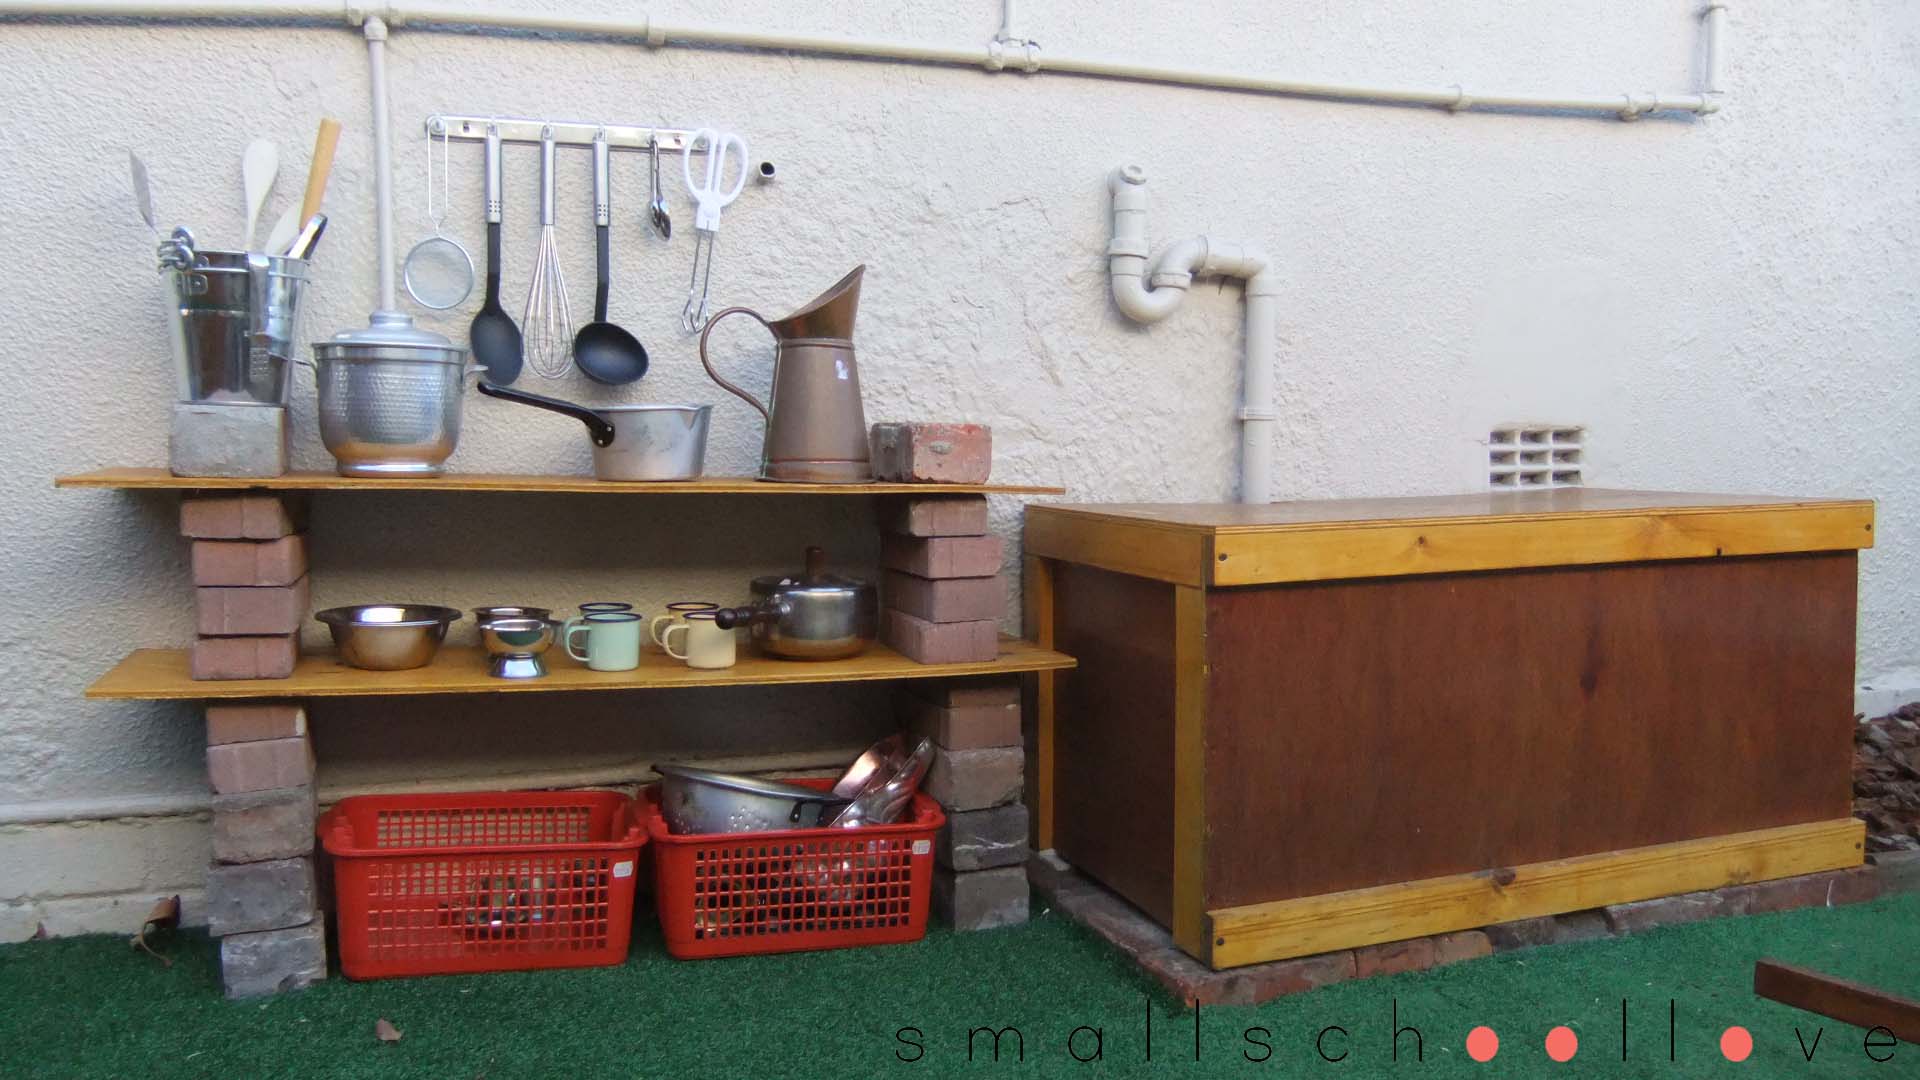
Our kitchen is SO basic – just proving you don’t need to spend a fortune or have any major building ability to make your own outdoor kitchen. Most often the pots and pans end up in the sandpit or creek bed and thats fine! I’m always popping into second hand shops and browsing the pots and pans, bowls and spoons to add to the mix of equipment available. Great items to include are: tongs, funnels, sieves and measuring spoons. Nearly all the equipments encourages great fine motor development and concentration.
The children spend ages socialising and discussing their actions – I can just sit for ages listening to their animated conversation and delighting in their focused dedication to their task! Water, sand, pebbles, grass and scented herbs all come together in a frenzy of happy cooking!


This was an easy project and something I use so often – my first inexperienced attempt to make a miniature treehouse!…There are some really gorgeous pictures online as inspiration – it totally depends on your level of wood working skill and the tools you have available to use. I’m constantly using them in play provocations for the children with varying loose parts and am always excited when I see the reactions and outcomes.
Items we used: sanded non-toxic wood in varying size and shape; sand paper; glue gun; drill and screws.
The hardest part is finding the correct pieces of wood. We had cut down a number of trees in our garden the previous year and after checking they were non toxic species had stored them to dry for a number of months. Alternately find a saw mill that is able to sell/donate you off cuts. Along with some larger wood rings we used for the base and platforms from a saw mill, we had enough to start assembling and figuring out how everything was going to fit together.
The process was largely trial and error. The pieces all had to be sanded and smoothed to ensure no splinters could make their way into little fingers – although I didn’t want it to have too much of a “finished” look. (You can achieve this by de-barking your wood and applying beeswax sealant or coconut oil to it). I wanted it to be quite high in relation to the children to encourage play on different levels. Patient husband put the main screws in the base and larger branches and platforms that formed the basic structure. Once these were in place we pretty much played around with the smaller rings creating steps to the various platforms.


We used the left overs to make other smaller wooden elements for play. The process was really fun and has since then inspired me to make many more basic wooden play “landscapes” for the children to use. They really love the natural solid comforting texture of the wood and spend ages adapting the materials to suit their creative moods.


sharing ideas on early childhood play provocations and learning environments
sharing ideas on early childhood play provocations and learning environments
sharing ideas on early childhood play provocations and learning environments
sharing ideas on early childhood play provocations and learning environments
sharing ideas on early childhood play provocations and learning environments
Ideas and Reflections from a Project Based Preschool
Inquiry-based Learning / Outdoor Learning / All Things Play
Documenting life without school and free childhood.
sharing ideas on early childhood play provocations and learning environments
sharing ideas on early childhood play provocations and learning environments
sharing ideas on early childhood play provocations and learning environments
